|
Technique Home | Texture | Critique | Early Lessons
Early Lessons
As Mary Anne and I began multistage carving, we learned the same lessons that most carvers
struggle with as beginners:
Rose (4 inches square)
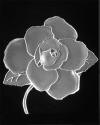 At first glance, Mary Anne's rose appears to be a conventional deep carved
image. The problem that developed here, was that later stages were causing
the fine detail in the center of the rose to disappear by the time that the
piece was finished. She solved the problem by remasking the first stages
(using graphic arts very thin tape) when doing the remainder of the piece.
Looking back, it would have been a whole lot easier with Silly Putty. At first glance, Mary Anne's rose appears to be a conventional deep carved
image. The problem that developed here, was that later stages were causing
the fine detail in the center of the rose to disappear by the time that the
piece was finished. She solved the problem by remasking the first stages
(using graphic arts very thin tape) when doing the remainder of the piece.
Looking back, it would have been a whole lot easier with Silly Putty.
Mucha "La Primevere" (5x8 inches)
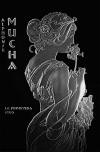 This
was the first attempt at doing Alphonse Mucha's graphic art piece in glass.
I managed to find a site in Czechoslovakia (thanks to the sandcarver discussion
group on Yahoo) that sold the same image done on a thick crystal vase, so
we had a reference piece done by a skilled craftsman as a guide. This was
a first attempt at contouring; note the definition in the right arm and
shoulder. Many problems with this piece. When I did the "Plume"
artwork, I thought of using this art for a companion piece. This
was the first attempt at doing Alphonse Mucha's graphic art piece in glass.
I managed to find a site in Czechoslovakia (thanks to the sandcarver discussion
group on Yahoo) that sold the same image done on a thick crystal vase, so
we had a reference piece done by a skilled craftsman as a guide. This was
a first attempt at contouring; note the definition in the right arm and
shoulder. Many problems with this piece. When I did the "Plume"
artwork, I thought of using this art for a companion piece.
In looking at the file, I very nearly had to redraw this entire piece,
because of design errors in this first attempt. Typical problems include
"bleeding" of the image where one line crosses another, or intersects a deeply
carved area. This is easily fixed in design, by stopping the crossing
line just shy of the deep carved section. In Illustrator, this can be
achieved by automatically multi-stroking the lines around the deep section,
with a thin black line on top of a larger white line, thus separating the two.
Another problem with these early pieces is the "coloring book" look that
happens when the outlines for the piece are carved deep, and the "fill" is not
as deep, leaving heavy outlines around each section. This can be
solved by outlining using very fine lines, and carving deeper with the fill.
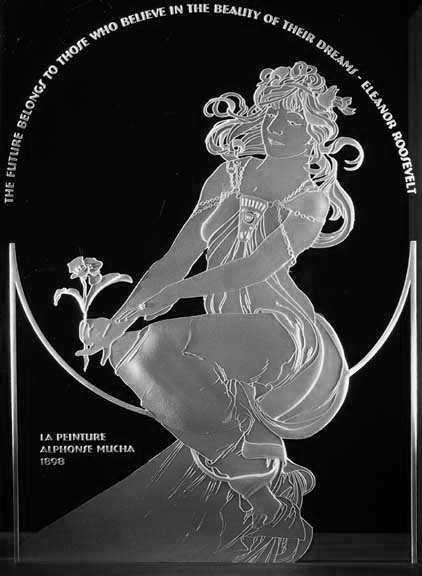
Mucha "La Peinture"
First attempt: fine detail only (piece is 8x10 inches)
 A
friend picked out this Mucha print for a Christmas present. It involved
several really tough challenges: how to detail the chains flowing over the
contours of the arm and shoulder, and how to show facial detail on a 3/4
portrait. I attacked the chains first, using a second resist (think of the
decals we used to use on model airplanes, and you're close). The chains
are shown in a detail view, further down the page. This effort would
have been easier if I knew that the glass needed to be sealed before the
second resist was applied. "Industrial strength" hair spray does the job. A
friend picked out this Mucha print for a Christmas present. It involved
several really tough challenges: how to detail the chains flowing over the
contours of the arm and shoulder, and how to show facial detail on a 3/4
portrait. I attacked the chains first, using a second resist (think of the
decals we used to use on model airplanes, and you're close). The chains
are shown in a detail view, further down the page. This effort would
have been easier if I knew that the glass needed to be sealed before the
second resist was applied. "Industrial strength" hair spray does the job.
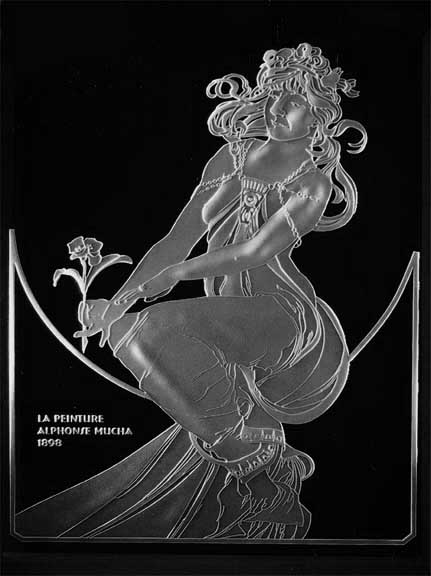
Second attempt (also 8x10 inches)
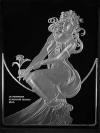 With
the chains kinda/sorta working, I decided to attack the face using diamond
engraving tools, since the area of the face is no more than about one inch
square. I was able to get some chin and cheek contour through blasting
with the 1/16 nozzle, but used the burrs on the nose. This is a skill that
will take probably years to master, even for simple things. I've just
received some
new burrs, and am having better luck smoothing the glass now that I've
done this a bit. Any guidance from experienced engravers would really be
appreciated. With
the chains kinda/sorta working, I decided to attack the face using diamond
engraving tools, since the area of the face is no more than about one inch
square. I was able to get some chin and cheek contour through blasting
with the 1/16 nozzle, but used the burrs on the nose. This is a skill that
will take probably years to master, even for simple things. I've just
received some
new burrs, and am having better luck smoothing the glass now that I've
done this a bit. Any guidance from experienced engravers would really be
appreciated.
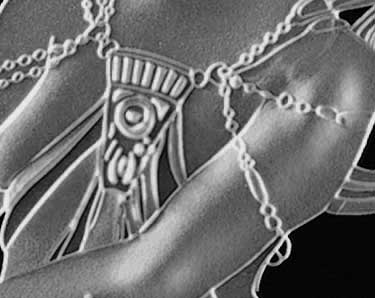
Chains detail (image area about 1 1/2 inches by 2 1/2 inches)
 Here's
that detail on the chains I promised. Getting the resist to stick on
previously blasted glass was a real challenge until I started with the
hairspray. Vacuum forming works, too, but it still requires a fair amount
of hand work. Here's
that detail on the chains I promised. Getting the resist to stick on
previously blasted glass was a real challenge until I started with the
hairspray. Vacuum forming works, too, but it still requires a fair amount
of hand work.
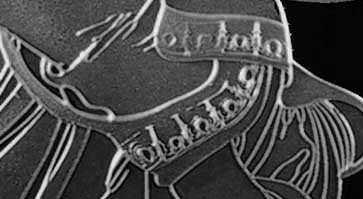
Hem detail
 The
hem was also detailed using a second resist. Note that part of the upper
detail blew out, despite very careful hand work. Again, the hair spray
would have helped The
hem was also detailed using a second resist. Note that part of the upper
detail blew out, despite very careful hand work. Again, the hair spray
would have helped
|